


>>For those non-sailors reading this, port lights are the window hatch looking things on the sides of the boat.<<
Not only were our existing Beckson port lights super cloudy and near impossible to see through, but they also leaked! The majority of our major leaks came from the original installation of the lights and their sealants (so it would have been difficult for us to merely fix the old lights since they weren’t in good enough condition to remove and rebed). Several of the lights had been leaking for so long that there was now damage to the adjacent teak and ceiling (which we’ve also fixed in the process — future blog post perhaps?).
Also, several of our old lights could no longer be opened because some of the hinges and dogs (dogs are what tightens the glass to the frame to make the seal) were broken. The plastic around the hinges on our existing lights was broken in many cases as well. Of our 12 lights, at least 5 had cracks in the glass or broken hinges/dogs — so we decided to replace all 12.
Installing our new port lights has been a very long and painful process for Jereme. Poor guy.
14 days in and we have a whopping 8 (out of 12) lights installed. Awesome.

The good news is that Jer’s slow pace on this particular project is not really his fault. Unfortunately, he ran into countless issues with the new trimatrix lights we purchased from Newfound Metals at the St. Pete Boat Show. Unfortunately, these lights just aren’t living up to their stellar pre-purchase online reputation (which is why we went with this brand in the first place).
Here are some of the issues we’ve encountered throughout the install process:
- Manufacturing issues. There have been more than a few. There are two hinges and hinge posts on each light. For some reason, one hinge post on each individual light was longer than the other. Um, wth??? We were told by Newfound Metals that they apparently had more of one size hinge post left over at the factory so the company used half of one size and half of another size on each light. This required Jereme to cut off a half-inch stainless bolt on 6 of the lights. Awesome.
- The install template could use some refinement. The install template was far from perfect and required multiple adjustments in order to drill all of the holes needed for each light. Plus, we had to redrill the holes after using the template because they weren’t big enough.
- Design/tolerance issues. The gasket on the window sits lower than it should (but only on some of the lights — again, what the heck?). This lower-sitting gasket causes a quarter inch or so of water to stack up and get trapped in the window. When you open the window, standing water drips in the boat. Probably not the best case scenario I would imagine.
- Inadequate install instructions. So, it turns out the hinges on each light are supposedly adjustable (Jereme learned this after having a convo with the owner); however the product installation guide makes no mention of this and the factory shipped one of our 12 lights with a hinge adjusted way differently than the others (i.e. flipped the wrong way — and we had no idea until we got a hold of the owner).
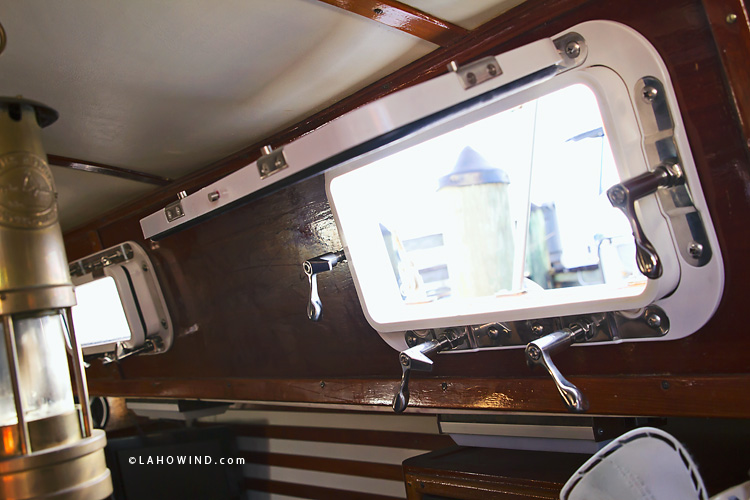
- More manufacturing issues. The hinges and dogs (closing latches) on the new lights are manufactured a little loose. So they wobble a bit, and the window tends to rub on the dogs. We really think this shouldn’t happen and is, again, a manufacturing issue.
- Technical support needs improvement. Getting answers from Newfound Metals on many of the issues above has been a little tough. Customer support was fine, but to get any real technical support, we had to speak with the owner of the company. And he was relatively hard to get a hold of.
Anyways, you get the picture. It’s been a little disappointing and majorly frustrating to say the least. We don’t have experience with any other port light companies from which to compare. We know that every boat is built so differently, so we knew going in that replacing our lights would be a very difficult project no matter which brand of lights we went with. In the end, as long as the lights DO NOT LEAK, we will be thrilled. Even if it takes 4 weeks to install them. 😉
I promise I’m not a total negative nancy. To prove it, here are a few positives about our new lights:
- They are relatively inexpensive compared to other brands (which I tend to think might be part of our issues above).
- They do not require any caulking or sealants. The lights are 100% gasket-sealed (removing the window only requires unscrewing 12 screws).
- All of the working components are stainless steel.
- They are a good replacement fit (shape/style) for our existing Beckson lights.
- And after a crazy rainstorm this week, our new lights proved successful with ZERO leaks!
Aside from all the headaches above, Jereme has managed to forge ahead on his own, and has used his crazy smart engineering brain to figure out all of the install issues himself. Jereme doesn’t cut corners and has made sure these lights are installed perfectly. Hence, the 3-4 week timeframe. He said Newfound Metals should pay him to write a way better and much more comprehensive instruction manual for installing these lights. And, I think they really should!
Here is Jereme’s quickie step-by-step guide to installing port lights:
- Unscrew all 24 screws on the old light.
- Peel off the trim ring on the outside of the light.
- Break the seal and pull the window out from the inside of the boat.
- Remove/clean all of the old caulk residue.
- Clamp the template onto the hole and use a router to cut out any excess fiberglass and wood in order to fit the new light.
- Drill the 12 bolt holes (using the template).
- Remove template and drill the 12 holes even more, from 3/8 inch to 1/2 inch. (*the template should have had larger holes to begin with).
- Remove new light from package, separating the inside from the outside part of the light.
- Place the outer trim ring on the outside of the light hole.
- Place the inner trim ring (the window) on the inside of the light hole.
- Bolt both trim rings together.
- Adjust the hinges and cam dogs until the window is sealed properly (and it opens/closes and seals).
- That’s it!!! Minus 1,000 other tiny details. Sounds so easy, but in reality, each step takes hours.
So, I am happy to report that we now have 8 of the 12 port lights installed (after about 3 weeks of work), and are bound and determined to successfully install each and every one of these puppies so we can cross this off the good ole project list.
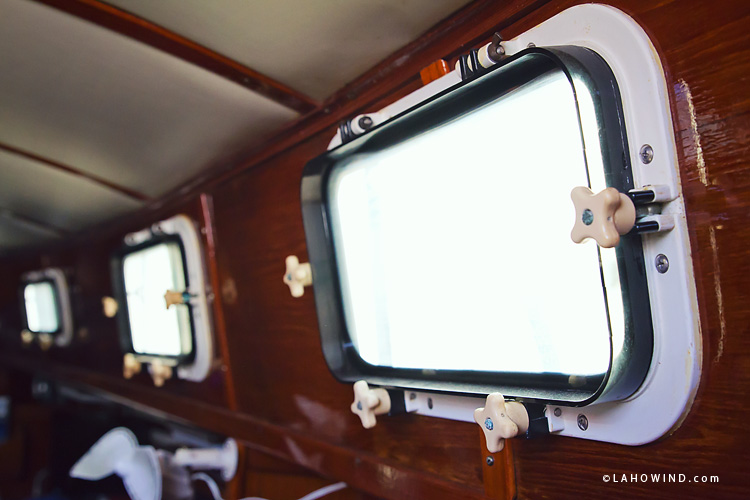
^^so long oldie goldie port lights with broken plastic.^^
^^hello pretty new windows!^^
^^it’s been a ton of work replacing our 12 port lights, but he persevered!^^
^^the fun continues.^^
^^check out those new port lights!^^
^^I can see clearly now, the rain (and foggy window residue) is gone!^^
>>Thanks for visiting LAHOWIND sailing blog! We’d love for you to get to know us and follow our story as we attempt to navigate a whole new world of sailing.
…Learn more about us and our sailing and cruising adventures.
We replaced our port lights with the same ones on our E37 in 2009. After the first 6-8 months, we ended up adding the teak frame to the 4 larger ones in the salon. As we sailed more and flexed the boat a bit, these lights leaked again and we were no longer able to make adjustments as we maxed out the length of the screws. Adding the teak frames allowed us to use longer screws and has made ours a dry boat for 4-5 years now. Just wanted to plant that in your heads in case it may be of value in the future. Best of luck!
Awesome job putting in those ports they look great can’t wait to see the finished product! Btw the beard is looking super tough, DONT trim it!!!
Jereme’s beard was the highlight of this article. 😉
[…] us. We thought we would be off sailing by the end of January. Turns out, certain boat projects (one in particular) take much longer than […]
I have just purchased the NFM stainless versions. One point in your instructions about drilling out the holes from 3/8 to 1/2. the bolt size is 3/8, but the stud on the trim rings is 1/2. NFM states in their instruction video that after drilling out the 3/8 holes for the bolts, then you use the piloted 5/8 bit, that they sell, to counter-bore the holes for the studs, but only to depth of the stud, not all the way through to the cabin. Your supposed to counter-bore to 5/8 so there is room for butyl to seal around the trim ring stud and hole.