


Phew! I was afraid we were going to have to run the motor non-stop to generate power on our sailing adventure, but lo and behold our long-awaited solar panels finally arrived (and are now successfully installed)! Hip hip hooray!
And it’s a good thing, because we are officially leaving tomorrow!!!!!!!!!!!!
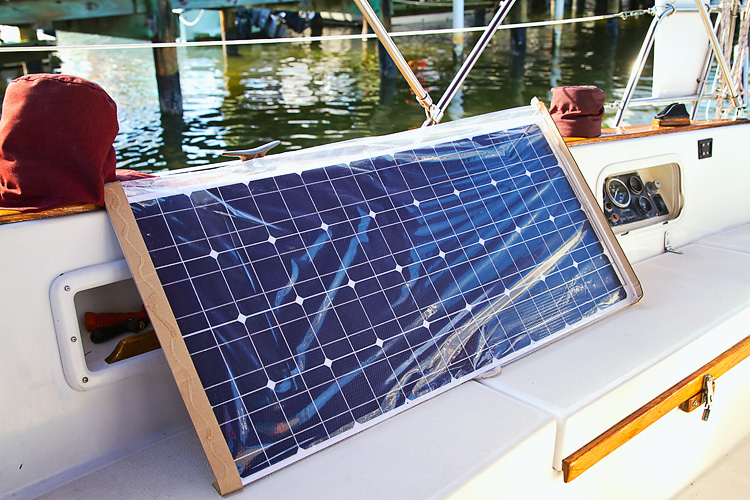
^^one of our fresh new panels – still in the plastic wrap!^^
Technically, this was a multi-step, multi-faceted project (not simply ordering and adhering new panels to our boat), which is why I decided to break it down into separate posts. There is WAY too much info to squeeze into one measly post.
In a nutshell, the overall electrical project included:
- Replacing our battery bank with a brand new system (from 3 batteries to 5!).
- Wiring a charge controller.
- Wiring a battery monitor.
- Designing and building a new support structure to hold the panels.
- Mounting and wiring the panels.
- Wiring a new inverter.
- Generating loads and loads of glorious power!
Doesn’t sound SO bad on the surface (I suppose), but, let’s not lie, it was very intimidating for anyone who has never done this before and/or kinda sorta despises electrical work. 😉 The good news is that, in actuality, it wasn’t quite as bad as we had assumed.
Now, let me back up a hair and give you a little background on our fancy new panels.
We researched a few different solar panel companies, and opted to go with >>Aurinco<<. We definitely only wanted the newer, thin and light weight panels on our boat. (Just a little FYI…these panels are so wonderful that they are in SUPER HIGH demand. I believe Aurinco is currently on a three to four week backlog. If you are looking to order/install panels and are working with a timeline, order now!)
We ordered three of the Compact 100+W panels. They are less than 3/16 inch thick and weigh less than five pounds each. Pretty awesome, huh?
They can also be mounted on curved surfaces (including directly onto fabric). Which is another reason we selected this style panel. We originally planned to mount these *directly* onto our bimini canvas (and planned our layout of 3 panels to fit perfectly as such) . However, after the panels arrived and we dry fitted them on the bimini, we realized that the way our bimini is designed (with a high pitch in the center) it would make more sense to build a support structure to hold the panels just slightly above the bimini. Although the panels are flexible, we don’t want them *constantly* bending and flexing. Hence, the add-on step of building new supports and more on that later!
STEP 1. Replacing Our Battery Bank
The first part of this project involved replacing our battery bank. Before adding all new solar panels to charge our batteries, we figured, why not upgrade our battery bank at the same time? You know…why put all this time, money, and effort into charging three old batteries that aren’t going to support our power needs?
Our boat had 3 batteries when we bought it…one start and two house (installed around Sept. 2010). Although we didn’t have any issues with those pre-existing batteries, we didn’t want to simply add two new batteries to the current stash (it’s not usually a good idea to mix up the batteries like that).
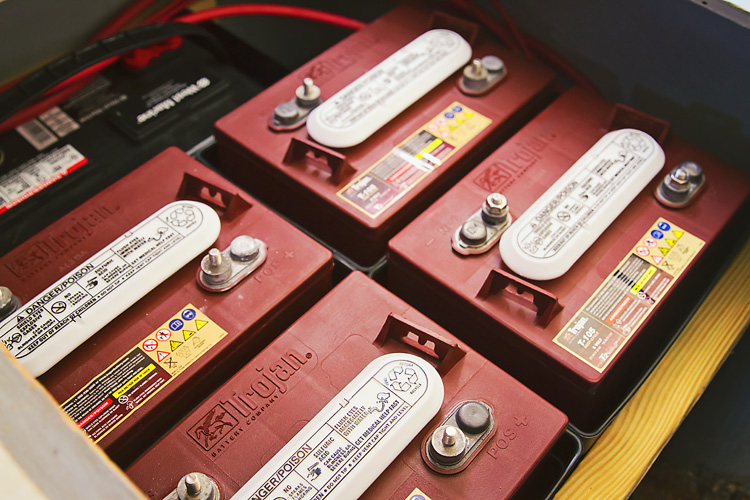
We purchased four Trojan T105 batteries and one West Marine starting/deep cycle group 27 battery. The Trojan T105’s are 6-volt golf cart batteries, made for lots of wear and tear. But with 6-volt batteries, they must be wired in series to become 12-volt. With the new batteries on board, we went from about 192 amp hours to 450 (in the house bank). Major upgrade! 🙂
Another thing with our old set of batteries is that lead-acid batteries can leak and off-gas…basically releasing fumes and/or liquid (acid). And guess who’s batteries had been leaking??? Yup! Ours. 🙁 Turns out, our old set had basically rotted out the plywood structure they were sitting on. Jereme had to build a new (and much better) support structure…but the rotten wood made for a super easy demo/removal.
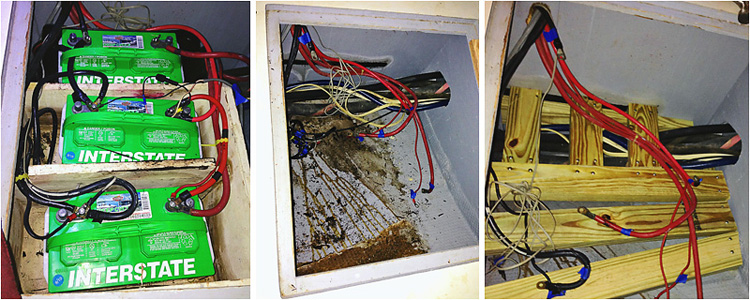
^^old batteries, major leakage, and our new support structure^^
The old setup also had WAY too much room between batteries (as Jereme says, “they could slide around like bumper cars in there.”) and you really should only allow no more than one inch in any direction. With our new structure (using 2×4’s since the hatch opening is pretty small), our batteries don’t move an inch!
We also added battery boxes to all 5 batteries so that if any of them leak, they will leak directly into the battery container and not the wood beneath (or, even worse, the structure of the boat).

As for wiring the batteries, before Jereme took all the cables off the old batteries, he labeled each wire according to terminals (so we’d be sure to get them rewired correctly). After installing the new batteries, he reconnected them in the same manner and then added all the new stuff…battery monitor, charge controller, and inverter (blog post coming soon on those!!!).
A few other things to note about the battery replacement…
Our marine survey said that we shouldn’t be using wing nuts on our batteries (which of course the old batteries had attaching the terminals). This is a major fire/safety concern. On the new setup, Jereme used all new nylock nuts and ratcheted them down to ensure good, solid connections. You definitely don’t want that much electricity flowing through loosey goosey connections, if you know what I mean.
Also, with any of the old wires that we used, Jereme made sure to add heat shrink on them to prevent corrosion. After everything was said and done, Jereme sprayed the terminals with Boshield T9 (also to prevent corrosion).
Our new battery bank is just what we need! We’re certainly not electricians on this boat, but after this project, Jereme sure as heck should be!
Lots more about the panel install, along with the new inverter, charge controller, and battery monitor. …Solar Panel Install Part 2 coming soon!
>>Thanks for visiting LAHOWIND sailing blog! We’d love for you to get to know us and follow our story as we attempt to navigate a whole new world of sailing, as we cruise the Bahamas + Caribbean.
You’re going to love the new battery bank and solar panels! I’m amazed at how thin and light those panels are . . . we bought ours ten years ago and the only ones available were the big heavy panels.
We cut our lines Thursday afternoon and are anchored all of 3 miles south of Naples in Champney Bay. Sounds like we will be traveling down south at about the same time tomorrow. We are thinking Little Shark river we are departing near sunrise. We’ll call you on VHF 16 when we get out there in the Gulf and see if you got out too. First mile is the hardest with all the pressure of what did we forget. Best of luck on your departure!
Russell & Lynne
Blue Highway
Boot key vhf channel 68 @ 9am cruisers net. Maybe we’ll see you this evening at music at the dockside grill.
Hey guys. Congrats on leaving. I got the card and gift you left the other day. Thanks so much, it was a pleasant early morning surprise. I may just have to meet you somewhere to help out with more projects. All the best and stay in touch.
Todd
Hi guys, nice article. It is good that you use a battery case to prevent possible leaking. However, it could be wise to use AGM batteries instead of traditional lead-acid batteries. These are leakage free and also need a lot less maintenance.
[…] ^^These^^ awesome new solar panels are really rocking our cruising world these days! Thank god we (Jereme) installed these babies before we left Naples. It might have been a bit of a learning curve on all the electrical/wiring install, but they are well worth their weight in gold. You can find Part 1 of our solar panel install >>here<<, where we talk about the type of… […]