LAHOWIND » Just you, me, + the dog.

Another boat project! Fixing a leaky hatch

Like most sailboats, ours has a few minor leaks. If anyone ever says their boat doesn’t have any leaks, they’re lying. Period.

At the moment, we know at least one hatch and three or four portholes are leaking. With the most likely culprit simply being the need to reseal each and every one.

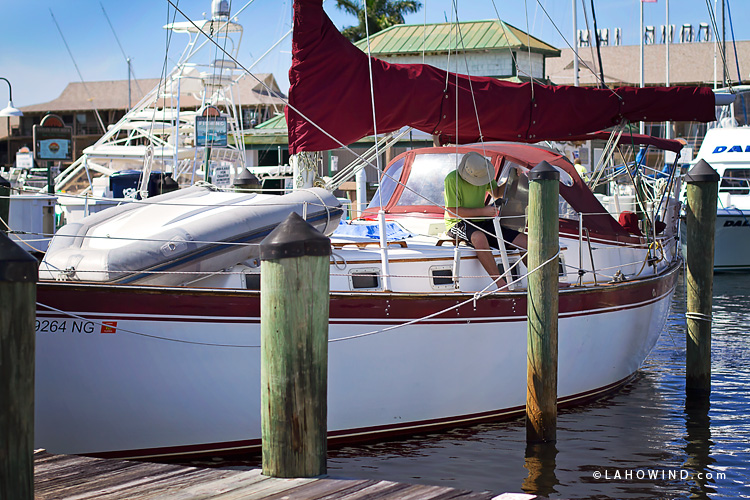
So about a week ago, Jereme got to work on the hatch in the main cabin. It was leaking from the silicone seal between the glass and the aluminum frame. And we knew we needed to replace the silicone with something better.

For once, this wasn’t a crazy, super time- labor- or cash- intensive project. Yay!

^^hi.^^

We opted for Dow Corning 795 Silicone Sealant — a high strength sealant made for buildings, high rises, that sort of thing.  Although it’s not technically designed for marine applications, Dow 795 definitely seemed like the best choice for the job. Here’s the description from Amazon — Dow 795 is a one-part, cold-applied, non-sagging silicone material that cures to a medium modulus silicone rubber upon exposure to atmospheric moisture.

Sounds perfect, right?!

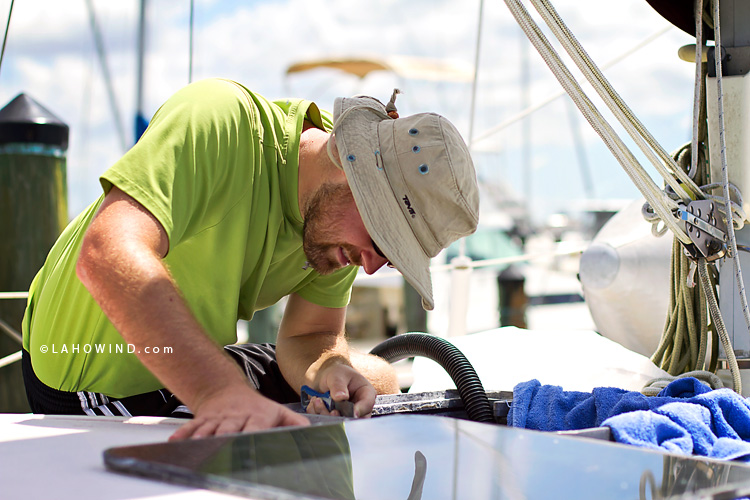
Jereme first had to prep all the surfaces. This means he had to “hand-scrape” every last little morsel of silicone off both the glass and the aluminum frame. (Which by the way is a royal pain in the you-know-what to scrape off.) If you leave any spec of silicone the new sealant will not work properly and we will have just created a new, fresh leak.

Jereme used a bevy of tools to get the scraping job done…a putty knife, his utility knife, a razor blade, screwdriver, etc. etc. etc. Thankfully, Jereme is super patient and extremely thorough and made sure there was not a trace of silicone left on that hatch.

Then, all he needed to do was replace the glass in the frame and seal the space with Dow 795. And leave it to dry. Pretty simple.

We can cross the main cabin overhead hatch leak off our list.

Now on to the others… 🙂 

Taking Down Our Sails for Some Much-Needed Care + Maintenance

…It’s like someone took the wind out of our sails. 😉

Okay, not exactly. But we did take down both the jib and main sails for some needed TLC. So, no sailing for us for the next week or two. Which is fine since we are simultaneously redoing the head/plumbing right now.

#horribleflaking

Our marine survey (back in April) revealed that the sacrificial canvas on the outer edge of our jib was in need of a little “restitching work.” That’s a nice way of saying we had a gaping, foot-long tear in one particular area of the jib’s sacrificial canvas. This becomes rather obvious once the sail is up.  Along with that, both the jib and the main sails were both in need of some ‘all-over’ restitching.

So, we took down both sails for the first time ever this weekend.

And, of course (although we were cautiously optimistic) we still thought taking the sails down would be super simple. I know — probably not the smartest considering it’s our fist time doing this.

Turns out, like most things, it took us 5+ times as long as we thought. However, I will say, the next time we need to take down the sails, I can guarantee we’ll be MUCH faster (now that we know what the heck we’re doing). 🙂

We started with our (roller furling) jib. Taking down the jib wasn’t difficult at all. But flaking it nicely (while still on the boat) was much harder than one would expect.

We did the best we could (which was horrible) and then bundled it all up and carried it off the boat.

^^it wasn’t pretty, but she’s off the boat.^^

^^the jib is officially down.^^

…We decided that our jib sail flaking and folding was so ugly and bulky that we ended up carting our jib down off the dock past all the shops and restaurants in Crayton Cove, to a grassy area where we were able to unfold and spread it out in order to re-flake/fold it.

That worked much better!!!

After the jib was folded up and in the trunk of the jeep, we started on the main.

The main wasn’t too bad. Although, the worst part of the whole sail-taking-down process was the 12 or so horrible split rings that had to be removed and reattached on the sail track on the mast.

^^the split rings are the keychain-ring-looking parts.^^

Ugh, those split rings are the worst! Your fingers and nails are basically destroyed after removing the full set. Not fun (for Jereme). (PS – We found out afterwards (always a good time for critical project information) that we didn’t need to remove the sail from the carts and would have saved a few fingernails in the process.)

Once those were all taken care of, we just unhooked the sail from the cars on the boom.  And after we untied the battens and removed them, the sail was ready to go.

We kept our regular sail ties on and folded the main in thirds and carried it off the boat. No need for a re-fold job like the jib required. The main was ready to go in the car immediately!

We drove both sails down to Bronwen the Sailmaker on Marco Island. She came highly recommended from several folks in the sailing community. It will take at least a week for her to restitch and make the necessary repairs on both sails.

And, I’m sure putting the sails back up is going to probably go as smoothly as taking them down. 😉 So at this point, I’ll say project half complete!

Here are a few extras from today’s festivities at the dock…

^^Oliver supervised from the comfort of the deck.^^

^^someone’s nice looking grouper catch.^^

^^the green parrots were back today at sunset…and kindly pooped on our boat.^^

>>Thanks for visiting LAHOWIND sailing blog! We’d love for you to get to know us and follow our story as we attempt to navigate a whole new world of sailing.

JackieOctober 1, 2013 - 2:10 pm

Ron and I had to take the sails off our boat this weekend for winter storage…BOO! Trying to get the headsail down on a windy day while sailing around on our moorring was a bit tense 🙂 Oh, and I couldn’t get the clutch to release the genoa sheet so Ron had to come back and hammer it loose. Always something on a boat right?!?!

[…] may recall this post at the tail end of September where we were taking down our sails for some maintenance and repair […]

how we roll. friday night = cheap tacos + a visit to west marine

Is this what our lives have evolved to?  Sizzling hot Friday nights at Taco Ardiente and a visit to West Marine? 😉  Sheesh!

Could be worse, right?

^^checking out parts for our re-plumbing project.^^

But in all honestly, we LOVE it!

What’s wrong with thoroughly enjoying some tasty, cheap mexican food, along with a couple cold beers, and then throw in some new boat goodies from West Marine…and you’ve got yourself a party?

Hope your Friday nights are equally as “special.”  🙂

#ballers #17dollartacoandbeerdinnerfortwo

boat life lately. according to my iPhone.

Join the party and follow us on instagram!!! @lahowind

Instagram

>>Thanks for visiting LAHOWIND sailing blog! We’d love for you to get to know us and follow our story as we attempt to navigate a whole new world of sailing.

Waterproofing Our Canvas Bimini + Dodger

One of the nice features about our boat is that it came with a beautiful canvas bimini top and dodger. Both of which were on our original “must-have” list when boat shopping.  With the obvious need being shade — a major necessity when sailing in the sunny tropics. But the slightly less obvious need simply being cover from rain or bad weather.

Luckily, both our bimini and dodger seemed to be in pretty great condition when we purchased the boat back in April.  So, of course we didn’t anticipate needing a boat project list line item for “waterproofing the canvas.”  Turns out, we were wrong.

We quickly learned after a fun “save the poodles” 😉 kind of pop-up squall while sailing over the 4th of July with my sister Susan and brother-in-law Eric that our bimini immediately starts leaking once it’s saturated. (I really wish we had a photo of our wet and seriously pissed poodles, along with our own drenched selves.)  Lesson learned… Our bimini top in its current state is pretty much useless after it gets wet.

Hence, item #43 on our list.

We researched all respectable waterproofing solutions, and quickly came to learn that 303 is the go-to product for waterproofing canvas or sunbrella fabric.

After watching the best 303 instructional waterproofing video I could find, I purchased one bottle each of the 303 Fabric Cleaner Concentrateand the 303 Fabric Guard Water Repellantso we could properly clean the bimini and dodger canvas and then waterproof it with the fabric guard.

Once our amazon order arrived, we were ready to rock and roll!

The cleaning part (using the cleaner concentrate) was super simple. I mixed one part concentrate with a bucket of water and used a soft cleaning mit (placed over our scrub brush) to gently clean and agitate the canvas surface. (Next time we do this, I will invest in a soft bristle brush instead of trying to make the mit/brush combo work.)  I made sure to fully rinse the product off the canvas, and even rewashed the bimini and dodger with clean water a few times just to be sure.

After letting the canvas thoroughly dry for about an hour, I moved on to part 2: “waterproofing.” Both Jereme and I were a little concerned about overspray from the 303 Fabric Guard getting on the clear vinvyl windows of our dodger, so we dediced it would be best to cover them with paper before applying the fabric guard.

^^This^^ was definitely the most time-consuming aspect of the entire project since I had to carefully fold and tape newspaper onto each window (in the blazing hot sun).

After the protective paper layer was up, it was merely a spray job from there. Easy peasy.

I followed the video’s instructions, and sprayed the product both horizontally and vertically across the canvas in sort of a crosshatch pattern, so it would adhere better to the pores of the fabric.

We used one full bottle of fabric guard to cover our entire bimini AND dodger (and one small portion of the concentrate — we’ve got lots of that stuff leftover).

I am happy to report that both canvases are now visibly repelling water and we can successfully cross this bad boy off the project list!

^^The face^^ of overheated project completion… 😉