Oh hey, this is a total crafty Kim post, but who said we couldn’t have a little variety around here? I mean, really, enough with all these D.I.Y. boat projects and talk about fittings, and hoses, and pumps. Blah, blah, blah. We need a little craft in our life. 😉
Or more so, a crafty “Box of Sunshine!”
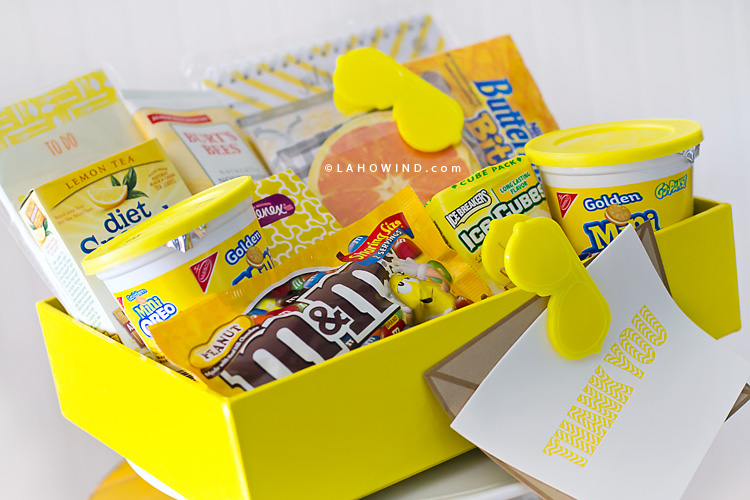
I put together this fun thank you gift for Jer’s aunt and uncle for generously taking us along with them to Las Vegas over Labor Day weekend. Thank you Pinterest for another fab idea! …Although, I made sure to personalize our version of this cute thank you gift.
I actually managed to pack (like in a suitcase) everything you see here. 😉 Along with come cellophane wrap and ribbon so that we could “assemble” the final product once we arrived in Vegas…and hand-deliver these goodies to the aunt+uncle’s hotel room.
To create our Box of Sunshine, I went on a hunt for all things yellow (and cute) at Target, and found lots of goodies, along with the perfect yellow acrylic box to showcase them in.
The sunshiny goods:
Peanut M&M’s
Butterfinger Bites
Golden Oreos (snack-size containers and SUPER delicious I might add!)
Ice Breakers Lemon Ice Cube Gum
Burt’s Bees Body Lotion (a favorite)
Cute “To-Do” Notepad
Cute Travel Calendar
On-the-Go Diet Snapple
Adorable Orange Slice Note Cards
Sunglass Shaped Chip Clips
I ended up throwing in a few extra goodies after I snapped this photo (like lemon JellyBelly jellybeans and some candied orange slices from Fresh Market).
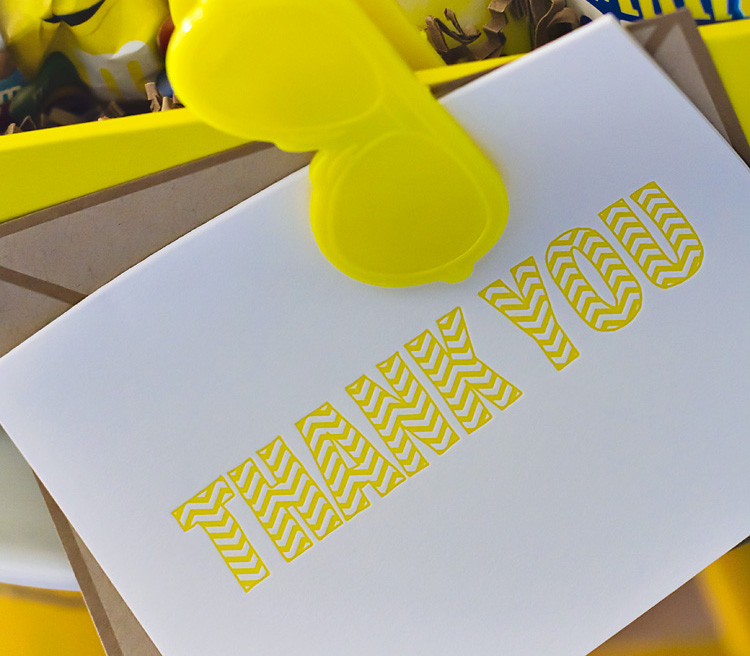
I ordered these adorable Ink Meets Paper thank you cards (printed on an antique letterpress in Charleston, South Carolina) to go with the gift. I will definitely be ordering more paper goods from this super cute shop on Etsy!
Everything in the box made it safely to Vegas, and the box was a big hit! 🙂
Posted in Other, Sailing BlogTags: Box of Sunshine, Couple Sailing, Crafty, Cruising Blog, Endeavour 37, LahoWind, LahoWind Kim, Pinterest, Sailboat, Sailing Blog, Thank You, Thank You Gift Idea
“We got no food, no jobs…our PETS HEADS ARE FALLING OFF!”
Okay, none of that is true. Thank god. But the classic line referencing parakeet Petey from the movie Dumb & Dumber is the first thing that comes to mind when I think of parakeets.
Lately, this awesome flock of 100+ green parakeets, actually known as rose-ringed parakeets, have been frequenting the Naples City Dock. Jereme’s seen them a few times, but this was my first sighting. Turns out, these parakeets have populated Olde Naples for 30+ years.
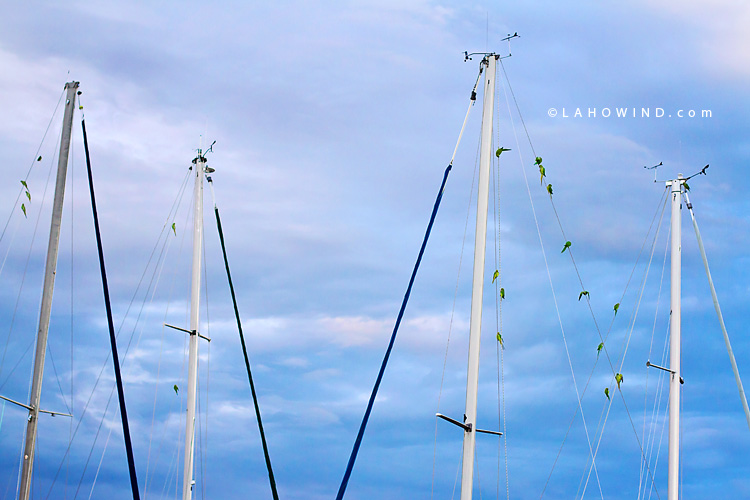
Massive importation decades ago by the pet industry and releases by pet owners enabled feral flocks of these popular cage birds to roost in many urban areas. Florida is believed to be home to hundreds of thousands of these non-migratory birds, which have established breeding colonies that have easily adapted to our ecosystem.

Lucky for us, the Dock was rather deserted on Saturday evening around sunset, so these parakeets were flying from boat to boat without much disturbance. I snapped a few photos of these pretty birds before they were eventually scared away. You never know what you’re going to see at the Dock. 🙂
>>Thanks for visiting LAHOWIND sailing blog! We’d love for you to get to know us and follow our story as we attempt to navigate a whole new world of sailing.
Posted in Boat Life, Sailing BlogTags: Cruising Blog, Endeavour, Endeavour 37, Green Parakeets, Green Parakeets Naples, Green Parrots in Naples, Laho Wind, LahoWind, LahoWind Video, Naples Sailing, Rose-Ringed Parakeets, Sailboat Dog, Sailing Blog, Sailing Couple, Sailing Dog, Sailing Photography, Sailing Photos
Last Tuesday after work, Jereme planned on heading down to the boat to install the last 1.5-inch tank fill fitting on our new 90-gallon water tank.
He had been to Home Depot THREE times to find a way to attach the fill hose to the tank using PVC fittings. Finally he went to the local Marine Trading Post trying to find a hose fitting that was barbed on one end (to fit inside the existing hose) and threaded on the other end (to screw onto the fittings on the tank). He found three of them, all the same size but all a litte different, so he bought them all.
Jereme knew it was going to be difficult to insert the barbed fitting end into the hose (since he had recently done the same thing while working on the shower sump removal project). The existing hoses on our boat are metal reinforced hoses that really just don’t stretch. On the shower sump project, Jereme and his buddy Chris tried to use AstroGlide (I know, pretty hilarious right? — two guys just hanging out on a boat using astroglide to fit a hose) and were only able get the hose on about 2 barbs deep out of the 7 barbs in total. Needless to say, Jereme knew he was in for a struggle with the water tank fitting.
As luck would have it, just before Jereme left to head down to the boat, he was leisurely flipping through the latest Cruising World mag and stumpled upon an article about boat hoses.
I kid you not…the EXACT.SAME.HOSE.FITTING.BATTLE he was about to fight that evening was discussed in the very article he had just flipped to. What are the odds?!
The article mentioned how hard it can be to insert these fittings into metal reinforced hoses. Yep! That’s accurate! 😉
The million dollar tip of the day… grab the visible end of the metal wire with pliers and pull out enough of it to make the end of the hose flexible/expandable. Who woulda thought?
So that night, Jereme went down to the boat, grabbed the little metal wire and pulled about a foot of it out the end of the existing hose. He then inserted the fitting and, voila!!! it went in all the way without excessive force or struggle. A couple of stainless steel hose clamps later and the project was complete!
Thank you Cruising World! 🙂
Posted in Boat Projects, Sailing BlogTags: Boat Projects, Endeavour, Endeavour 37, Laho Wind, LahoWind, Naples Sailing, Replacing the Water Tank, Sailboat Projects, Sailing Blog, Sailing Couple, Sailing Dog, Sailing Photography, Sailing Photos, Water Tank, Water Tank 1982 Endeavour 37
We took a weekend off from boat projects and reality to jet off to Vegas with Jereme’s Aunt Bren + Uncle Mikey for a fabulous Vegas vacation!
Hello Vegas! #roomwithaview We spent the long weekend at the Bellagio soaking up the dessert sun while drinking Limonda Rosadas at our pool cabana, enjoying some amazing dinners at Tetsu Masa, Prime, and Olives, watching Uncle Mikey win huge in the casino, taking in the Beatles LOVE Cirque Du Soleil show at the Mirage, enjoying a spa morning and facial, and lots more! Gosh it’s hard to come back to reality after a weekend like we had. Here are a few iPhone pics from our fabulous weekend… I already wanna go back! 😉
Well, it has been a couple of weeks since our last post about the water tank (10 Simple Steps to Replacing Our Water Tank), where we had just ordered our new custom tank and were awaiting pickup.
Two weeks ago, Jereme drove over to Lake Worth, Florida to the Dura-Weld shop. He met with Gareth, the owner, who was extremely knowledgeable, helpful, and brought Jereme right into his shop where he fabricates all custom plastic orders. Our new tank was waiting for us, so Gareth pressure tested its airtightness while Jereme looked on. Jereme talked with Gareth for about an hour, then loaded the tank into his jeep and was on his way back to Naples.
When Jereme returned, he ordered a replacement 6″ Beckson clear access port as the one that came with the tank was solid white and we want to be able to see the tank level without having to unscrew the cap. This came in the mail within days, and was a simple switch-a-roo. Jereme made a trip to Home Depot to purchase all the fittings necessary to reattach the existing hoses on the boat.
Prior to installing the tank, Jereme rebuilt the wall at the forward end of the bilge area where the tank sits (it had pretty bad water damage that needed to be removed). He used a piece of 7″ wide PVC “wood” that is actually made for outdoor trim around doors on homes. Using his Dremel, he cut this to size and used stainless screws to patch up the wall as needed.
Jereme and I lugged the new water tank down to the boat last Saturday. I will say, the new tank was much easier to handle than the old aluminum tank and only took us about 5 minutes to get it on the boat and in the hole compared to about an hour (and lots of bickering) to get the old one out. 😉
^^working hard or hardly working?^^
Jereme’s custom measurements turned out pretty perfect! Thank god! He thought he had designed the new tank to be one inch shorter than the previous tank so that we could install PVC boards below the tank to help drainage through the bilge. However, once installed, we noticed that it was actually the same height as the previous tank and therefore there was no room for boards underneath. ??? That’s okay, it will actually work out better because we get more tankage volume and, since the bottom is a little narrower then the previous tank, water can actually flow pretty well around the tank edges if needed.
Jereme spent all day Sunday hooking up the fittings, which have turned out flawless (so far). He filled up the tank a quarter of the way, fired up the water pressure, and opened the taps. This also tested out our new water lines that Jereme installed on the boat a few weeks back. The only leaks we saw were right at the head sink fittings, where the brass compression fitting screws onto the plastic threaded nipple on the sink. Jereme unscrewed those fittings, used a little more Teflon tape, and reinstalled the fittings. No leaks!!!
So, our new water tank is officially installed, waters flowing out of the sinks, and now were off sailing! There is still some follow up work needed to make sure the new tank won’t shift in the bilge area. We’re thinking this will be in the form of custom wood or rubber work, but the bulk of the water tank project is complete and we are extremely happy with the install! 🙂
Posted in Boat Projects, Sailing BlogTags: Boat Projects, Endeavour, Endeavour 37, Laho Wind, LahoWind, Naples Sailing, Replacing the Water Tank, Sailboat Projects, Sailing Blog, Sailing Couple, Sailing Dog, Sailing Photography, Sailing Photos, Water Tank, Water Tank 1982 Endeavour 37
|


You should check out my girl Kerry’s stationary shop – I love her stuff, particularly her “ahoy” cards! http://www.etsy.com/shop/kbatty
We had a shop together back when I lived in brooklyn. She’s awesome, and her stuff is awesome 🙂
I also am sick of thinking about hoses, clamps and fittings. Enough!
Oooh! Totally checking out Kerry’s shop. I love nice paper! 🙂 And I thought it wouldn’t do any harm to squeeze in one little crafty blog post, right?! 😉
Love a crafty post. 🙂 Cute!
Thanks Anna!!! 🙂
LOVE!!!!!!! :))