


There’s somewhat mixed opinions among photographers about watermarking their work. Some feel it distracts from the image while others see it as a reliable way of tackling image theft. The jury’s still out on my opinion ;)), but whatever side you’re on, it doesn’t hurt to know how to watermark your images using a custom brush in Photoshop.
With a brush preset, you will be able to add your own custom watermark to any photo file with a simple click of the mouse. Basically, your own little digital stamp! Pretty great, right?
First you need to create the watermark file.
Open a new file in Photoshop (File >> New). Select the appropriate dimensions for your watermark. It has to be less than 300 pixels/inch since you cannot create a watermark over 300. I recommend sticking to a web resolution of 96dpi or 72dpi since chances are, your watermarked images are being used online in a digital format anyhow. Make sure the “background contents” option is set to “transparent.” This will allow you to have a clean brush with no square edging or solid color behind or around your watermark.
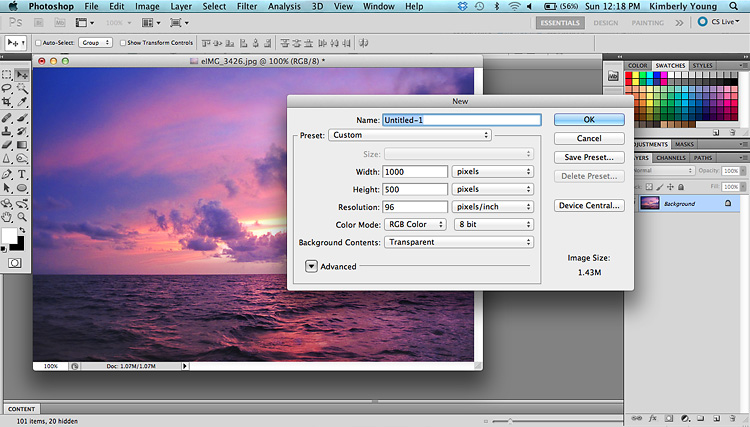
Next, using text or a predefined logo file, create your photo watermark within the new file you just created. You can either open your logo as a separate file and drag the contents into the new file, or simply use the Text tool to type your preferred watermark contents.
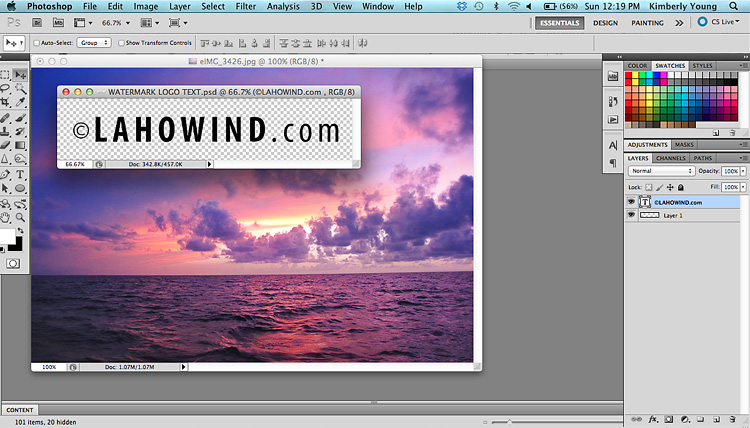
Once you are satisfied with this new watermark file, do not flatten the image. However, if there are multiple text layers, you will need to merge layers (Layer >> Merge Layers).

Here’s where the magic happens!
With your watermark file still open, simply select Define Brush Preset from the Edit menu. Then name your brush, save it, and you are be ready to start watermarking your photos.
So simple, right?!
Your new watermark brush will appear at the bottom of your brush palette. All you have to do to use it is open a photo, select the brush tool (and your specific brush from the palette) and size, and click once with your brush to apply your watermark. You can change the opacity of the brush depending on how opaque or transparent you want that watermark to be. And also, of course, change the size and color (but make those selections before you actually stamp the photo).
*I’ve started a regular “PHOTO FRIDAY” series on the blog. You can find all of my photography series posts >> here.
>>Thanks for visiting LAHOWIND sailing blog! We’d love for you to get to know us and follow our story as we attempt to navigate a whole new world of sailing, as we cruise the Caribbean. …Learn more about us and our sailing + cruising adventures.
Thank you!
Fabulous photos as usual Kim! Hope you are having a great time and so glad to hear Oliver is feeling better!
Thanks Keri!!! 🙂 -Kim