LAHOWIND » Just you, me, + the dog.

Photo Friday: How to Sharpen an Image in Photoshop

Before we get to sharpening, I wanted to take 2.5 seconds to thank everyone for the great feedback and questions! I am thrilled some of you are finding my Photo Friday Series helpful. Yay!!! Keep those questions coming! :))

Back to regular scheduled programming…
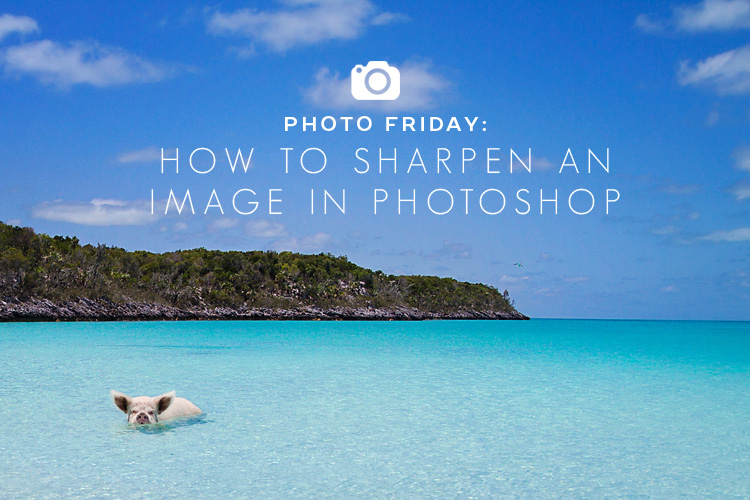
Sailing-Blog-Cruising-Caribbean-Photo-Friday-How-to-Sharpen-an-Image-in-Photoshop-LAHOWIND-eIMG_4113

Ahhhh, sharpening! I’ve received a handful of questions regarding this topic…and it’s a good one! Sharpening is such a great tool available in lots of different editing softwares, including Photoshop, to really make your images pop!

There is technically no crazy voodoo magic to achieve crisp polished photos.  Some people are under the impression that sharpening will help them recover lost details in pictures that are otherwise too blurry, dark, or bright to be usable. Unfortunately, nothing could be further from the truth. Sharpening doesn’t give back details. It makes the details you already have appear to stand out a little more. So before you ever get too crazy editing up a storm in the digital dark room, work on snapping a quality image the first time and you really won’t need to spend much time crisping them up after the fact. That being said, a little Photoshop sharpening can add a certain level of depth to your image by enhancing details and making it more refined.

Sharpening works by increasing the contrast along the edges so that there is a quicker transition from light to dark and the edges become more defined. Photoshop offers a few different ways you can sharpen or fine-tune a photo. The most traditional method is the Unsharp Mask (my favorite!), and the newer (and some would argue better) Smart Sharpen filter. By the way, I still think it sounds crazy to call a tool that “sharpens” an image the UN-sharp mask. What the heck?!?
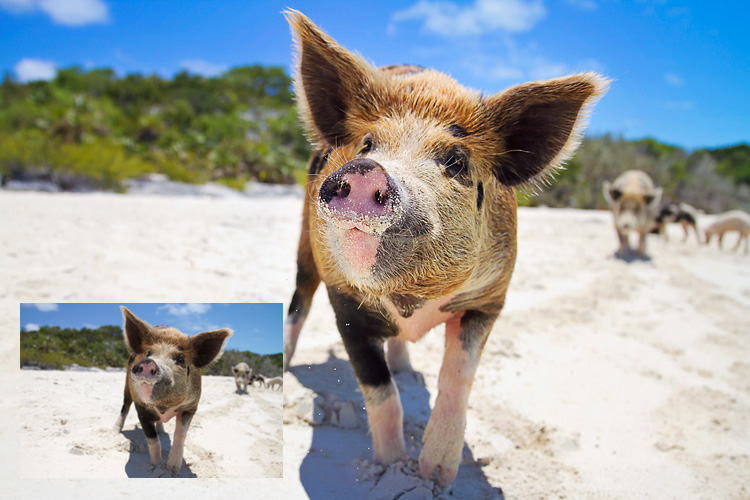
Sailing-Blog-Cruising-Caribbean-Photo-Friday-Tips-How-to-Sharpen-in-Photoshop-LAHOWIND-eIMG_4125-BLOG-SIZE-SHARPENED

I’ll be using ^^this photo^^ of my favorite island piggies from the Exumas, Bahamas to demonstrate sharpening because, seriously, how much fun is it to stare at zoomed in granuals of sand on one cute and extra hairy pink snout? ;)) PS – the before and after above uses some of the steps I talked about in my “Editing Basics” Photo Friday post two weeks ago.
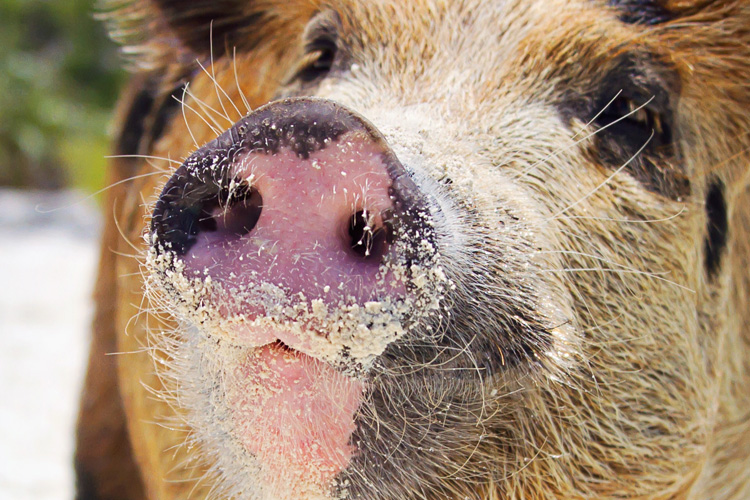
Sailing-Blog-Cruising-Caribbean-Photo-Friday-Tips-How-to-Sharpen-in-Photoshop-LAHOWIND-In-Focus-Photo

^^Here is a zoomed in look at my photo. That oinker means business! I did not sharpen ^^this version^^ whatsoever. The level of detail on my focal point (the snout) is still totally crisp…so when I do sharpen it in Photoshop, it is simply to give it a tiny bit of polish, if you will.^^

Using the Unsharp Mask:

First, locate the Unsharp Mask in Photoshop using the Filter menu — Filter >> Sharpen >> Unsharp Mask.

Sailing-Blog-Cruising-Caribbean-Photo-Friday-Tips-How-to-Sharpen-in-Photoshop-LAHOWIND-Unsharp-Mask-Screenshot

The dialog box that opens has three slider controls — Amount, Radius, and Threshold. Amount sets the overall level of sharpening; Radius dictates how large of an area around an edge is sharpened; and Threshold is used to indicate which edges are sharpened. A large threshold value means sharpening will only be applied to high contrast areas; whereas, a low threshold value means that sharpening is applied also to low contrast areas and finer details.

Sailing-Blog-Cruising-Caribbean-Photo-Friday-Tips-How-to-Sharpen-in-Photoshop-LAHOWIND-Unsharp-Mask-Normal-Sharpened-Screenshot

^^A normal/average amount of sharpening for this particular image.^^

Sailing-Blog-Cruising-Caribbean-Photo-Friday-Tips-How-to-Sharpen-in-Photoshop-LAHOWIND-Unsharp-Mask-Over-Sharpened-Screenshot ^^A scary amount of sharpening. Yikes! A pig should not look like that.^^

Pushing the level of sharpening too far results in a very scary contrasty photo. Over sharpening often looks WAY worse than sharpening at all. So puhhhhlleaasseee don’t go nuts with these tools!

Now, here’s an example with a human subject to give you another perspective. By the way, this image was shot on our second day as “official cruisers.” We had just crossed under the seven-mile bridge in the Florida Keys!!!

This image was first resized for web, and then sharpened…

eIMG_0774-WEB-SHARPENED

And a close-up of the before and after sharpening on some of Jer’s handsome facial features… ;))

eIMG_0774-ZOOM-SHARPENED-BEFORE-AND-AFTER

See the difference? Subtle, not crazy sharp-town or anything.

Finding a good recipe for ^^those^^ three sliders I mentioned above takes a little experimenting and finessing. But whatever you do, do NOT overdo it. Okaaaayyyyy? Okay, great.

Moving right along.

Using Smart Sharpen:

The Smart Sharpen tool is another sharpening option in Photoshop. Lots of folks rave about this one compared to the Unsharp Mask, but for some reason I’m still a fan of the Unsharp Mask route. Once again, go into Filter >> Sharpen >> Smart Sharpen.

Of course they made the default settings horrible for some reason. So be prepared to tweak them.

Sailing-Blog-Cruising-Caribbean-Photo-Friday-Tips-How-to-Sharpen-in-Photoshop-LAHOWIND-Smart-Sharpen-Screenshot

Adjusting the Amount and Radius settings in Smart Sharpen has the same impact as when using Unsharp Mast, but you can choose what type of blur (Gaussian, Lens or Movement) to correct using the Remove drop-down menu.

Sailing-Blog-Cruising-Caribbean-Photo-Friday-Tips-How-to-Sharpen-in-Photoshop-LAHOWIND-Smart-Sharpen-Normal-Over-Sharpened

Gaussian Blur is the general softness that is also addressed by Unsharp Mask, the Lens Blur option detects edges and detail and is a good choice for sharpening fine detail (that’s what I selected here). And Motion Blur aims to reduce the effects of camera or subject movement.

Obviously, there’s no magic number that works for all images so be prepared to experiment a little. Here’s the before and after zoomed in look at mr. piggy…you can see how the image on the right just pops a little more, right?

Sailing-Blog-Cruising-Caribbean-Photo-Friday-Tips-How-to-Sharpen-in-Photoshop-LAHOWIND-Sharpened-Before-and-After

A few “sharp” words of wisdom! ;))

1. Don’t sharpen your master image file. Create a copy of it and flatten all layers before running the Unsharp Mask or Smart Sharpen.
2. Sharpening is very specific to output and should be the absolute final step in your workflow. Edit, crop, resize, whatever, and then sharpen.
3. When sharpening, make sure you are viewing your image at 100% or you will not really see an accurate representation of your sharpened image. You could be way overdoing it and not even realize.

When done the right way, sharpening can greatly enhance an image and make it pop!

Happy Photo Friday!

*I’ve started a regular “PHOTO FRIDAY” series on the blog. You can find all of my photography series posts >> here.

>>Thanks for visiting LAHOWIND sailing blog! We’d love for you to get to know us and follow our story as we attempt to navigate a whole new world of sailing, as we cruise the Caribbean.

Puerto Rican Nights.

(Marina Pescaderia, Puerto Real, Cabo Rojo)

Just dusting off a few photos from the past few days. And although we’ve been having afternoon thunderstorms like clockwork, our evenings have been pretty nice to look at. They make for some killer sunset paddle seshies.

While Jereme typically grabs our SUP to go paddle around the bay in the evenings, I usually grab my camera to go snap a few photos of the pretty golden hour light.  Here are a few favs from the past two nights… Boy, was that pink sky something else.

Sailing-Blog-Cruising-Caribbean-Puerto-Rico-Pretty-Nights-Sunsets-LAHOWIND-Sailboat-eIMG_6738 Sailing-Blog-Cruising-Caribbean-Puerto-Rico-Pretty-Nights-Sunsets-LAHOWIND-Sailboat--1 Sailing-Blog-Cruising-Caribbean-Puerto-Rico-Pretty-Nights-Sunsets-LAHOWIND-Sailboat-eIMG_6880 Sailing-Blog-Cruising-Caribbean-Puerto-Rico-Pretty-Nights-Sunsets-LAHOWIND-Sailboat-eIMG_6565 Sailing-Blog-Cruising-Caribbean-Puerto-Rico-Pretty-Nights-Sunsets-LAHOWIND-Sailboat-eIMG_6911 Sailing-Blog-Cruising-Caribbean-Puerto-Rico-Pretty-Nights-Sunsets-LAHOWIND-Sailboat-2

^^that little speck in the sunset photo on the left is Jer paddle boarding way out in the bay.^^

On another note, we were  super stoked the other day to be handed a tasty baby dorado (mahimahi) as we were walking down the dock back to our boat (no good photos of the dorado, but a couple iPhone shots over on Instagram). I can’t NOT mention the dorado on the blog because A. that was the easiest fish we ever caught! ;)) and B. I made the greatest new recipe with one of the filets.

Seriously, how nice are our dock neighbors to just give us one of their fantastic catches after a day of fishing? We definitely weren’t going to turn down that awesome offer! This kind of “fishing” was a helluva lot easier than the kind we’ve become accustomed to, that’s for sure. It was so nice being able to fillet up the fish while tied securely to a dock…and with a hose/ample fresh water supply right at our fingertips to clean off the bloody fish-cutting area! Easy peasy.

We made a great grilled balsamic glazed mahimahi recipe the first night and then an even more A-M-A-Z-I-N-G coconut crusted mahimahi the second night! The coconut crusted fish recipe I randomly grabbed off of Pinterest that afternoon definitely did not disappoint. It was super easy, super quick, and didn’t require one ounce of frying. Yay, yay, and yay! Plus it was SO darn delicious! I did have to modify the recipe slightly since I didn’t actually have any Panko bread crumbs on board. I subbed in crushed up butter+garlic croutons instead and they worked perfectly! I’ll probably actually make it with croutons again in the future. If anyone happens to be in the market for a new fish recipe, this is definitely the one you want to try.

>>Thanks for visiting LAHOWIND sailing blog! We’d love for you to get to know us and follow our story as we attempt to navigate a whole new world of sailing, as we cruise the Caribbean.

PeterSeptember 17, 2014 - 10:13 pm

Hi

As a fellow chef and photographer I would really like the recipe for your coconut butter croutons encrusted mahi-mahi. My wife and I just bought a Benneteau 38 and should be sailings shortly. It’s a different life living on a sailboat versus the powerboat that we currently live on. I still love my Sea Ray 340 but gas is getting too expensive.

Thank you

Peter

Jessica @ MJ SailingSeptember 18, 2014 - 10:58 am

Beautiful golden hour photos. I just copied your coconut crusted mahi mahi recipe, I can’t wait to try it out. It looks so good!

Tuesday Tell-Tales.

(Puerto Real, Cabo Rojo, Puerto Rico)

Sailing-Blog-Cruising-Liveaboards-Caribbean-LAHOWIND-Photography-Sailboat-Lifestyle-Boat-Life-eIMG_2861

Can I please tell you that we’ve really been loving our easy breezy cruisy life here in Puerto Rico, minus the crazy thunderstorms ^^like this one about to roll in^^ that have been popping up like clockwork every afternoon. Almost feels like we are back in Florida or something? We’d probably even try collecting that rain if it wasn’t for the free stuff here at the Marina. But man do these daily thunderstorms really put a damper on any fun outdoor activities when it’s raining cats and dogs, and our own dog is shaking like a leaf down below deck. We probably should’ve invested in an anti-anxiety thunder jacket  for Oliver before setting sail.

Besides ^^those^^ annoying thunderstorms, we might also be stuck in a little bit of an easy-marina-life rut which, combined with the weather, might be why we’ve done a whole lot of nothing around here lately.

I’m not complaining.

Waking up late, lounging around, blogging, reading, cooking, loving on Oliver…it ain’t too bad if you ask me. ;))

But there are always boat projects to be done. And, of course, now that we figured out our dinghy is hypalon, we’ve been having one hell of  a time trying to locate the necessary  patch and special glue needed to fix our dinghy leak. Turns out, you can’t really mail any crazy glue chemicals to Puerto Rico like the ones we need because they aren’t allowed on a plane. What the heck?! Only ground shipping, which rules out us island folk completely. :((( And we have tried (to no avail) to locate the same goods at a retailer here in PR (which has been hilarious). But nothing. Notta. Zilch. It’s a no-go so far on the dinghy patch although I am quite positive Jer can find a good solution. We’ll keep you posted.

There also another mast climbing adventure in our very near future so Jer can reinstall our (now fixed) Raymarine wind instrument. Let’s hope it works longer than about 3 weeks this time.

Did I mention that Oliver got another fresh cut, color, and blow-dry the other day? Okay scratch the last two, just a cut and shampoo actually, and he is loving his shorter ‘do as always. We still aren’t pros at the actual styling, but we tried are hardest and that’s all that matters. ;)) Plus, Oliver escaped unharmed this go-round with no nicks or cuts! That’s a win in my book.

Sailing-Blog-Cruising-Liveaboards-Caribbean-LAHOWIND-Photography-Sailboat-Lifestyle-Boat-Life-eIMG_0204 Sailing-Blog-Cruising-Liveaboards-Caribbean-LAHOWIND-Photography-Sailboat-Lifestyle-Boat-Life-eIMG_0315

And for no good reason other than I thought it was hilariously true here’s how you eat on instagram vs. real life. Lol.

>>Thanks for visiting LAHOWIND sailing blog! We’d love for you to get to know us and follow our story as we attempt to navigate a whole new world of sailing, as we cruise the Caribbean.

snoozerSeptember 16, 2014 - 8:59 am

The best way to get supplies from the states is to have someone bring them in with them. Friends can always be loaded up with spare parts. Bostich makes the best two part glue for Hyp, and you should be able to find it on island. Regular contact cement will work in a pinch, if you double it up. Good luck.

BillSeptember 23, 2014 - 12:20 pm

Forget the hypalon glue products, they don’t hold up. You can use fast set 5200 and in a pinch super glue works pretty well. At the end of the day our inflatable boats are all just “deflateables”. Have fun 🙂

I Luh Ya Puppy! {Video!!!}

Dontcha think Oliver really needs his very own GoPro video???

Great! Because we made one! ;))

This little Oliver vid has been a work in progress for waaaaayyyyyyy way too long! But I’m SO thrilled I finally finished it because it might just be my favorite video yet! Don’t tell anyone, but I’ve watched it about 200 times already.

After living aboard for the past (almost) 6 months, Oliver has become quite the bonafide boat dog. We couldn’t imagine life without our favorite poodlepants. He seriously makes every day that much sweeter. He’s been such a good little traveler, soaking up lots of new experiences and loving every minute of this sailing adventure with us.

We’ve managed to capture lots of special ‘Oliver moments’ over the past few months of cruising through the Bahamas and Caribbean — so we squashed them all into one three and a half minute video.  Enjoy!!!

PS – MAKE SURE YOUR SPEAKERS ARE TURNED ON so you can enjoy our awesome song selection. ;)) “We luh ya puppy! We luh ya luh ya luh ya puppy.”

*You can check out more about Oliver and his boaty boat dog lifestyle here on our blogsite.

>>Thanks for visiting LAHOWIND sailing blog! We’d love for you to get to know us and follow our story as we attempt to navigate a whole new world of sailing, as we cruise the Caribbean.

Carolyn - The Boat GalleySeptember 15, 2014 - 2:35 pm

He’s just too cute and too much fun! Wish we were in the same area so we could arrange a puppy play date — I think he and Paz love all the same things!

Rob BlackwellSeptember 15, 2014 - 3:23 pm

Ahh Kimmy,

That video is so awesome!! I am so freakin envious of your adventure and now seeing Oliver I think I want to be a dog..What a life. Love the doggies. Most loyal buddy one will ever have.
Lovin Naples and back at Xmas!! Rob

JanSeptember 15, 2014 - 8:50 pm

I Luh “YOUR” puppy!

Great job Kim, Poodlepants (too cute) looks so happy.
Thanks for sharing your video.
((hands cupped around mouth with yelling)) BOOOOOOOO Vimeo
I must say…….an awesome song choice too!

Jan
((hugs))

JanSeptember 15, 2014 - 8:57 pm

Oooopsie that should read ((hands cupped around mouth WHILE yelling))
Note to self. Re-read before sending.

Lara SpragueSeptember 16, 2014 - 3:14 am

Soooo…. Great!!!!!
It’s not only a great video to document your amazing trip, it’s an amazing video to capture your lil guy. Makes me want to do the same thing with our boys. (Minus the awesome backdrop, sigh). 😉
Glad to still be following your blog. It’s keeping me in the Long Island mindframe.

Allison HSeptember 16, 2014 - 9:50 pm

LOVED it!!!! It’s so great to see Oliver so happy! Can’t wait til we are right behind you guys! Keep the videos coming!

Photo Friday: Favorite Photo Editing Apps

I don’t think it will come as any shocker to anyone that I am kinda-sorta obsessed with iphoneography + instagram. A few folks have even commented… “how do you get your instagram pictures to look like that?” and then they move on with their lovely lives or maybe even eat some food that they didn’t even photograph first. Crazy, I know. ;))

But that’s why I’m here. I wanted to share my very favorite photo editing apps with ya’ll. And a few runners-up too!

Sailing-Blog-Cruising-Photo-Friday-Favorite-Photo-Editing-Apps-FI-LAHOWIND-2

^^I of course had to use an iPhone photo for this — they really do take a pretty great shot!^^

It seems like there are more than 2 million different photo editing apps out there these days. It can be a little daunting to just pick just one, let alone differentiate between all the different filters and features once you actually install one of these babies. On a personal note, it feels like it’s taken me forever and a ton of trial and error to find my favorite apps. But now I have it all down!!! And it only takes me about a minute or two max to edit a photo.

And since I’m assuming some of you might actually be looking for a good photo editing app that will really help you polish your photos before posting them — I thought this would be the perfect PHOTO FRIDAY post! If you don’t use any of these already, here are the apps I recommend you download immediately…

VSCO Cam is my absolute FAVORITE!!!!!!! The user interface takes a little getting used to, for sure. But once you do, you’re golden. Tapping on an image thumbnail in the library view will display a row of icons across the bottom to deselect, flag, edit, export, or delete the image. Taping the edit button (the one that looks like a wrench and paintbrush), takes you into photo editing mode — where you can apply any one of VSCO Cam’s awesome one-tap filters. The (hello FREE!) app comes with ten  filters that are all quite fantastic (in my opinion) so there’s no crazy reason you can’t process some excellent photos with these!

Sailing-Blog-Cruising-LAHOWIND-Photo-Friday-VSCO-Cam-Screenshots-Favorite-Best-Photo-Editing-Apps-Cruising-Sailboat-1a

My favorite filters are M3, M5, F2, T1 (all for color)…and X1 for black and white (but turned down a few notches). Aside from the filters, there are a bevy of other editing options like exposure, temperature, contrast, saturation, etc. etc. etc. It’s really truly awesome.

Here are some example iPhone shots edited in VSCO Cam…

Sailing-Blog-Cruising-LAHOWIND-Photo-Friday-VSCO-Cam-Screenshots-Favorite-Best-Photo-Editing-Apps-Cruising-Sailboat-2

iPhone photo taken at Cape Santa Maria Resort in Long Island, Bahamas.

  • Filter used: T1 (100% opacity)
  • Saturation: +3
  • Sharpen: +4
  • Contrast: +4

Sailing-Blog-Cruising-LAHOWIND-Photo-Friday-VSCO-Cam-Screenshots-Favorite-Best-Photo-Editing-Apps-Cruising-Sailboat-4

iPhone photo of a baby manatee taken in Marathon, Florida Keys at the dinghy dock.

  • Filter: M5 (opacity +9)
  • Saturation: +4
  • Sharpen: +3

Sailing-Blog-Cruising-LAHOWIND-Photo-Friday-VSCO-Cam-Screenshots-Favorite-Best-Photo-Editing-Apps-Cruising-Sailboat-3

iPhone photo taken…um I can’t remember…so let’s just say taken in gorgeous turquoise water. ;))

  • Filter: M3 (opacity +8)
  • Contrast: +1
  • Saturation: +2
  • Sharpen: +3

Sailing-Blog-Cruising-LAHOWIND-Photo-Friday-VSCO-Cam-Screenshots-Favorite-Best-Photo-Editing-Apps-Cruising-Sailboat-5

All time favorite iPhone photo taken (on an iPhone 3 for that matter) back in Naples on New Year’s Eve 2012. We didn’t even own a sailboat at the time. Little did we know how much awesomeness the next two years would have in store.

  • Filter: F2 (100% opacity)
  • Saturation: +6

Now for the runner-up apps…

Pic.Tap.Go! is my go-to app when I want a different crop ratio for my photos. It lets me sorta paste a non-square photo onto a white square background so that I can easily upload it to Instagram without having to crop my full photo into a square proportion. Did that even make sense?

Snapseed is amazing for selective adjustments. Like if I just want to enhance the color/brightness in one area of the photo, I am able to in Snapseed. Snapeeed was one of my favorites early on and every once in awhile I revert back to it.

Fhotoroom is the only mildly comparable photo editing app I’ve found for my new Windows phone. Oh, have I mentioned that my iPhone crapped out a few weeks back and I am stuck with a cheapy Nokia for another two months or so. Luckily, Jereme is packing a brand spanking new iPhone so I typically just grab his phone anytime I want to snap a quick photo for instagram. Anyhoo, Fotoroom is not nearly as amazing as any of ^^those other^^ apps, but it gets the job done. And bonus, it includes a similar feature to the one I love so much in PicTapGo that allows me to put my non-square photos on a square white background so that they are prepped and ready to upload in Instagram.

I hope you guys find this helpful and not totally boring! ;)) Most of these apps do take a little getting used to, but the difference you will see in your photos is oh so worth it!!!

Soooooooooo….what other “photo” questions do you have for me? Let’s hear em!!!!!

*I’ve started a regular “PHOTO FRIDAY” series on the blog. You can find all of my photography series posts >> here.

>>Thanks for visiting LAHOWIND sailing blog! We’d love for you to get to know us and follow our story as we attempt to navigate a whole new world of sailing, as we cruise the Caribbean.

Jody - Where The Coconuts GrowSeptember 12, 2014 - 7:37 pm

Good stuff. How about apps for adding text or other special effects? I really like TitleFX but looking for others as well 🙂

LAHOWINDSeptember 12, 2014 - 9:55 pm

Thanks Jody! 🙂 Any of the text overlays seen here on our blog are done in Photoshop for me. I’m not a super big fan of too many “special effects” and therefore not all too familiar with the apps available for that, although I’m sure there are plenty to choose from. -Kim

ElizabethSeptember 14, 2014 - 10:43 pm

Hi! Your Photo Fridays have inspired me to go back through some of my old photography. My husband and I are planning on moving aboard with our kids in a few years, and I know that I’m going to want to document that. One thing I would love to hear from you is what are some of your favorite editing “tips and tricks” that you wish you had learned about earlier?

By the way, I really enjoy your blog. Thanks for sharing!

Thanks,
Elizabeth

LAHOWINDSeptember 15, 2014 - 4:25 am

That’s awesome Elizabeth! 🙂 I have a few posts in the works featuring more specific editing tips! Be sure to check back for those. And thanks so much for following! -Kim

Kevin - SailFarLiveFreeSeptember 17, 2014 - 5:03 pm

Thanks for the free tips! I’m a total wannabe photographer and always soak up info from the pros. BTW, your blog really stands out because of your photography…some of the best in the sailing biz!

LAHOWINDSeptember 17, 2014 - 9:38 pm

Wow! Thanks SO much Kevin!!! You just made my day. 🙂 -Kim

Clubtray SailingSeptember 22, 2014 - 9:46 am

Awesome photography. Could you tell me please what type of camera is very useful and easy to use for the photographers (beginners) and if you know any online photography courses that could be helpful as for beginners? Again great work you have here.

[…] so I know I talked about my favorite iphone photo apps awhile back, but what about techniques for taking a killer smartphone photo? You know, simple tips […]